Ottawa

Ottawa. Wow what an experience!
Normally just a passing through on the way to Montreal, this time I was headed to visit a friend from university.

My family being from Montreal, I love Montreal style bagels. The chew, the crunch, the flavour from the wood fire oven. The secret is the dough, but as well, the indirect cooking.

IMG_3536

First the bagels are boiled in honey and water in the large kettle seen in the picture. Then they are dusted in poppy seeds, sesame seeds, or whatever kind of toppings are being put on them. The bagels then are inserted at the left side of the oven on long wooden planks, nearest to the burning wood. In cycles of around 5 minutes, the bagels get continuously moved through the oven until they are finished baking. They are then taken out and served as fresh as can be.

Normally, Montreal bagels can only be found in Montreal. However, I was happy to hear that nearby to where I was staying, there was a 24/7 bagel store named Kettleman’s (http://www.kettlemansbagels.ca). They bake their bagels all day and serve 1000s of gracious customers. All their bagels are $.99 and each one is as delicious as the last. This place really gave me the flavour of old Montreal. Walking up to the counter, ordering a bagel with cream cheese and smoked salmon. Then of course taking bagels home to enjoy whenever I want. If you’re ever in Ottawa and miss a taste of just across the Quebec border, make sure to stop by this shop. A must see for bagel lovers.

IMG_3532IMG_3533

Kettleman’s Bagels
912 Bank St, Ottawa Ontario.
Across the street from TD Place.

http://www.kettlemansbagels.ca/about-us/montreal/

Eat. Love. Share.

– Zack

Backyard BBQ

What is better than a backyard bbq with some friends on a bright and sunny summer day? Not a heck of a lot, I’ll be totally honest.

About 4 years ago, I started a tradition of hosting my friends for a backyard bbq get together. The first year I did all the cooking, BIG MISTAKE. Cooking appetizers and main courses for 12-15 people did not allow me any time to enjoy the party or the company. So from then on I made sure it was potluck. Everyone brings a little something and you don’t have to worry about cooking so much yourself. We had a wide variety of salads, pasta, burgers, hot dogs, etc…

FullSizeRender-38

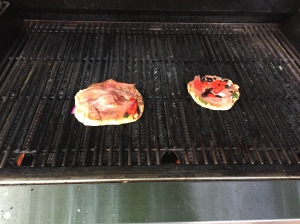
This past year’s bbq, I was excited to try something very different but something I had been waiting to try for a while. GRILLED PIZZA!! A break from the traditional baked pizza, but 100% worth a go if you’re feeling adventurous.

Just like a baked pizza, you start with the dough. This amount of dough makes 8-10 individual pizzas.

1  2/3 cups water
1 package yeast
1/4 cup olive oil
4 cups flour (all purpose)
2 teaspoons salt
2 tablespoons honey

Add the yeast and water to a bowl, let the yeast bloom for about 2 minutes. Add the honey and let the yeast continue to bloom for another 3-4 minutes, until you get the perfume of the yeast. Honey contains sugar and the yeast feed off that sugar, giving you a better rise once the dough is made. After the yeast perfumes, add the oil and mix. Add the flour and salt and bring the dough together to form a ball.

Flour your counter or cutting board and bring the dough out on to your surface. Knead it for 6-8 minutes to allow the glutens in the dough to develop. After kneading, drizzle a separate bowl with olive oil and leave the dough in the bowl (covered with plastic wrap) to rise. The excess oil in the bowl will make sure the dough doesn’t stick. After about 1-1.5 hours, the dough should have risen, punch it down and let it rise a second time if you like or use it right away.

Divide and portion out the dough into individual balls…. When its time to grill, take a ball and roll it out to about 1/4 inch. Oil or spray the grill to make sure the dough doesn’t stick. Stick one side on the grill and allow it to cook (3-4 mins). Once the first side cooks, take it off the grill. Add your desired toppings to the cooked side and return the dough to the grill, cooking the second side of the dough and melting the cheese (another 2-3 minutes). Just like a baked pizza, you can really top your grilled pizza with anything. Here I went with roasted red peppers, prosciutto, black olives, and pesto.
IMG_3506

Eat and enjoy :).

Eat. Love. Share.

– Zack

Canada Day. 4th of July. BBQ

Canada Day. 4th of July. Whatever Independence Day you celebrate I hope you had a great time filled with good company, good food, and good times. For my Canada Day, I decided to take in the Blue Jays game with some friends. Had a couple hot dogs, some beers, just good old fashioned, simple fun.

IMG_3488

This philosophy of simplicity can also be transposed to the kitchen. For my 4th of July celebrations, my family had some friends over for an afternoon BBQ. When most people entertain, they like to show off and over complicate things in the kitchen. However, simplicity is usually best. We ended up making a plate of ribs with 2 side salads and people loved it.

IMG_3496

The ribs were very simply smoked over indirect heat (put the ribs on one side with the gas off and turn the other half of the grill heat on), for about 2 hours. Then they were grilled at the end to give them that charred, smoky flavour. The first salad is a corn and peppers salad with tomato, avocado and red onion. The dressing is mayo (1 cup), lime juice and zest (2 limes), olive oil (1/4 cup), 3 tablespoons dijon, parsley, salt and pepper. This amount of dressing was enough for 10 people, so adjust accordingly. The other salad is a traditional tabouleh with bulgar wheat, cucumber, tomato, chickpeas, lemon, and parsley.

You’ll notice that nothing on the plate is terribly complex. Just simple grilled meat with a couple side salads prepared in advance. Simple food, prepared well, is always a recipe for success in my book.

Eat. Love. Share.

Zack

New way to do shrimp

Shrimp is one of my favourite foods in the entire world. Dare I say it, some days, I will take a bunch of perfectly cooked shrimp over a steak.

I had been looking for a new way to do shrimp and had been playing around with things for a little while. I decided to add some spice to my cooking by using chipotle peppers. For those of you who do not know, chipotle peppers are just jalapeños which have been smoked. While canned, chipotle peppers can be found in the Mexican aisle and give a great smoky flavour to any dish they’re used in.

I used the chipotle peppers in both the marinade and in the finishing sauce. For the marinade, I blended chipotles with lime juice, garlic, oregano, salt and pepper. Definitely start by using only 1 or 2 chipotles and adjust accordingly, things can get overpowering if you add too much too quickly. After marinading for a few hours, I took the shrimp to the grill. I saved some of the marinade and brushed the mixture on the shrimp while they were grilling. Now one thing about cooking shrimp, or any type of seafood really, is once its gone over cooked, there’s no saving it. Seafood is not like a steak where you can serve it at different temperatures. Seafood must be well cooked (for shrimp, 2 minutes maximum per side). Anything over that and they usually go rubbery and are just plain awful to eat.

I served the grilled shrimp with a very simple herbed rice. Boil water (At least 1 cup of water per 1/2 cup of rice).. Once the water boiled, I added butter, dried parsley and basil, and then the rice. Cooked until tender. The herbs grab on to the grains of rice while cooking and makes for a much more flavourful side dish.

A second side I made for this plate was a salad of fennel, beets, and orange segments. Cut the orange into segments and take out the seeds. I used a mandolin to cut the fennel, it is a tool which allows for precise cuts and control of thickness. For this salad, I wanted the fennel as thin as possible. And finally the beets, I boiled them for about 40 minutes until tender. Remove them from the boiling water and move them to a bowl of cold water to cool down. After cooking, remove the skin (it should come off with minimal pressure. Dice the beets and add it to the fennel shavings and orange segments. Dress the salad with lime, fresh parsley, olive oil, salt and pepper. Simple yet delicious.

IMG_3493

Not my prettiest plate ever, but the flavour was definitely there.

Try this recipe if you want to spice things up every once in a while.

Eat. Love. Share.

– Zack.